
Summer is in full swing and one thing I always love to do this time of year is cut up and tie dye some of my tees! All you need for a little customization is a sharp pair of scissors, a tie dye kit, and a deep breath — this can be fun and will make your tee even more unique than it already is!
I realize that the thought of potentially ruining your favorite tee can be a little anxiety inducing — which is why I’ve compiled some of my best tips and tricks into one blog post for you, so let’s go!
Tips + Tricks for Cutting:
- First and probably most important, you need a pair of sharp scissors! Your regular old kitchen scissors will do the trick, but the sharper the better to keep your cuts as clean as possible.
- Now that you’re ready – I highly suggest doing a test run. If you’ve got an old tee that’s stained or not in the best shape, this would be perfect for that!
- Tee, scissors, check! One last important thing to remember before getting started: less is more! You can always go back and cut more!
- Now is the time to decide the look you’re going for. Keep in mind where you cut is likely to roll a bit. So it may end up slightly shorter than the original cut (which is why the less is more reminder is important!)
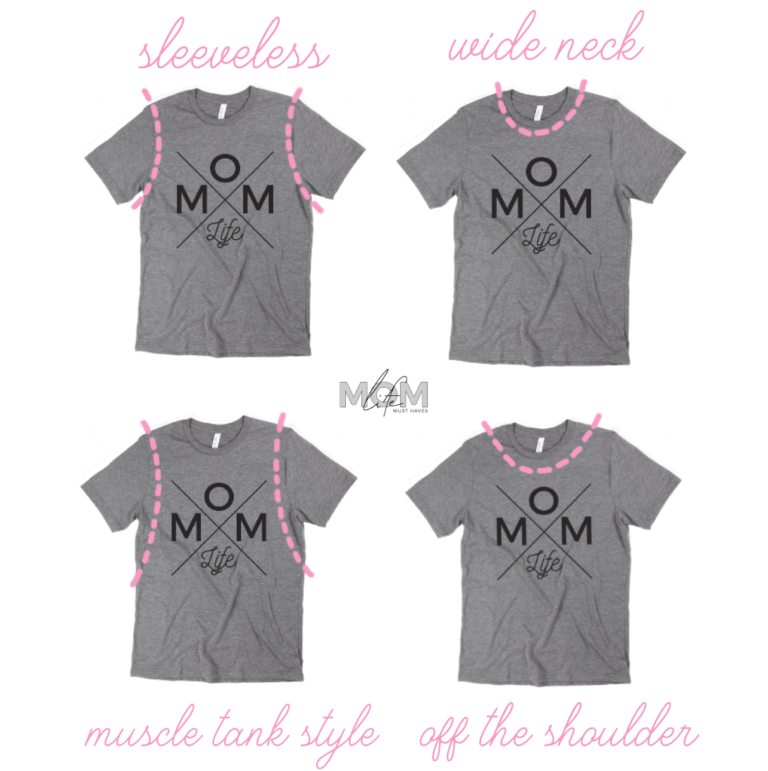
- If you’re wanting to increase the size of the neckline: you can start by cutting the entire collar out. The key to avoiding little pits in your cuts is to make one big cut, don’t keep stopping. Use one hand to cut, and one hand to keep your tee pulled tight so it’s a nice clean cut!
- If you’re wanting to cut the sleeves off: cut the sleeves right at the inside of the seam, so you’re removing them in one swoop! Again, use one hand to keep the tee pulled tight and the other to cut.
- Folded, or unfolded? You want to minimize the number of times you have to stop cutting, so I recommend having your shirt laid flat on a hard surface and cut both the front and back sides of the shirt at the same time
- The graphic below illustrates 4 different cut styles and the look you’ll achieve with each. Remember, less is always more! If you’re unsure if a scoop neck style is for you, start with cutting just the collar and you can always go back in for another cut! The key is keeping the garment stretched tight while cutting, so more than one cut is totally doable!
Use the slider below to take a peek at some mamas who cut up their tees!


Tips + Tricks for Tie Dyeing:
- Pick your style! Most tie dye kits come with instructions for different ways to fold or crumple your garment.
- Glove up. This process can be messy so make sure you’ve got a set of gloves handy!
- Know the look you’re going for. Tie dying is different from cutting in that less is not always more — unless you want more white than dye. Don’t be afraid to make sure you cover both sides of your shirt with dye!
- Short on time? I LOVEEEEE this two minute tie dye kit, i mean, love. It saves hours of waiting and I am certain the colors hold more vibrantly! It comes with or without dye and can also be found at Michaels.
- Don’t forget the rinse. This is an important step, because if you toss your tee into the wash without the cold water rinse it’s likely to blend the colors together and change the final product!


Now, it’s time for a contest!
We’d love for you to come on over to our Facebook Community here, where you can find details later on today about not one but two fun contests coming soon!

No Comments